Build your own cryptocurrency price alert service using NodeJS
Bitcoin
NodeJS
Blockchain
03/05/2021
ExpressJS, BullMQ, Cron jobs, email notifications and more.

Everyone in this world is busy. We are poor at remembering things (especially me). Being motivated by the above two statements, I ended up building this simple cryptocurrency price alert microservice, which will send an email notification if the price of the specified coin goes above/below the threshold price. We need not stare at the market to check the price all day. All you need to do is just choose the currency and specify the threshold price, that’s it. You’ll get notified via the provided email address.
I have used NodeJS for implementation. You can follow the steps and build the same using other programming languages as well. This tutorial is just for a demonstration, it is not production-ready or stable (as I will use store the alerts in-memory for simplicity). However, I’m sure that you’ll find this demo pretty interesting as we will implement queuing for notifications, send emails, service workers(Cron jobs), and more. You can also improve this by adding more features.
Having said that, let us have a glance at the key features of this project :
- Set price alerts — For the prices above/below a threshold price.
- Fetch all the active alerts
- Automatic expiry of alerts.
- Email notification.
Before getting started, you’ll need the following :
NodeJS : Install the LTS version for your operating system.
Postman : A tool to play with the APIs on the fly. In this demo, we will use this software to create and retrieve alerts.
Redis server : Install and configure it locally or you can opt for a cloud service provider if you prefer. We need the Redis server to deal with the Bull MQ.
SendGrid API key : Use this link to create a new account and get the API key. It is required to send email notifications
Once the environment is set up, we can dive into the implementation part.
Initialize the project:
Follow the below steps to initialize an empty NodeJS project.
- Create an empty directory.
mkdir price-alert- Navigate to the directory —
cd price-alert- Initialize a new project —
npm initand answer the questions. Or you can usenpm init -yto settle with the default configuration.
Install the dependencies :
We will use the following dependencies in our project.
1.Express: To handle the HTTP requests from the client. Helpful in building APIs
2.Axios: A library that helps us make HTTP requests to external resources.
3.Bull: Robust messaging queue based on Redis
4.Cron: Used for job scheduling.
5.Nodemailer: Used for sending email notifications.
Let us now install all the dependencies using the following command :
npm install express axios bull cron nodemailer --saveNote: You can also install the developer dependencies like nodemailer if you prefer.
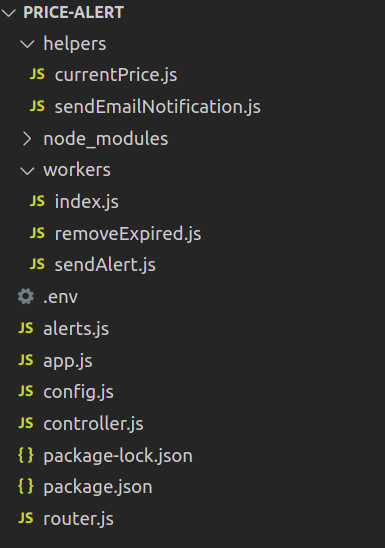
Project Directory Structure:
Let’s get started:
In the app.js file let us configure the express server. Add the following contents and save the file.
const express = require("express"); const app = express(); // Initialize an express instanceconst PORT = process.env.PORT || 5000; // Define the portapp.use(express.json());// Health check endpoint (optional)app.get("/", (req, res) => { return res.json({ status: "Up and running" });});// Start listenting for requestsapp.listen(PORT, () => console.log("Server started listening!"));Fire up the server using the node app command. You’ll see the following output :
Server started listening!If you navigate to http://localhost:5000/ .You must see the status as Up and running
Cool. Now our application can process the HTTP requests.
Implementing the endpoints:
Let’s now create a router.js file that will contain all the endpoints used in our project.
const express = require("express");const router = express.Router(); //Instantiate routerconst Controller = require("./controller");router.get("/prices", Controller.CurrentPrice); // To get the current price .module.exports = router;The controller.js file will contain the logic for each endpoint.
Let us define the logic for the endpoints. First, let’s start with the CurrentPrice endpoint.
exports.CurrentPrice = async (req, res) => { try { let prices = await currentPrice(); if (prices.error) return res.status(500).json(errorObject); return res.status(200).json({ success: true, price_data: prices.data, }); } catch (error) { return res.status(500).json(errorObject); }};You can see that I used the function currentPrice to fetch the current market price.
Let us implement the “currentPrice” function inside the helpers folder. This is the most important function as we will use this function in many places of this application.
For the sake of simplicity, I implemented only BTC and ETH price alerts in this demo. You can add whatever assets you prefer.
To fetch the current price of ETH and BTC, I am using the nomics api . You can fetch the price from any source.
const axios = require("axios");module.exports = async () => { try { let url = "https://api.nomics.com/v1/currencies/ticker?key=demo-6410726746980cead2a17c9db9ef29af&ids=BTC,ETH&interval=1m&convert=USD&per-page=2&page=1"; const resp = await axios.get(url); return { error: false, data: { BTC: resp.data[0].price, ETH: resp.data[1].price }, }; } catch (error) { return { error: true }; }};Also, I have defined an error object in the config.js file which can be sent, in case any unknown errors occur while processing requests.
module.exports = { errorObject: { error: true, message: "Oops, something went wrong.Please try again later.", } }Import the error object and the current price function in the controller file and save it.
Now let us test our GET /prices endpoint.Fire up the server and navigate to http://localhost:5000/prices. You can see the price object being displayed in the browser or hit the endpoint through the Postman.
Great! We managed to get the current market price of ETH and BTC in USD.
Let us move ahead to implement two more endpoints for creating alerts and retrieving all active alerts. For using the alerts globally in our application, we will create a file alerts.js that exports an empty array.
module.exports = [ ];Import the file at the top of controller.js file.
var alerts = require(‘./alerts’);Let’s define the logic to create new alerts.
exports.CreateAlert = async (req, res) => { try { const { asset, price, email, type } = req.body; if (!asset || !price || !email || !type) //Check whether all the fields are passed return res.status(400).json({ error: true, message: "Please provide the required fields", }); if (asset.toLowerCase() != "btc" && asset.toLowerCase() != "eth") return res.status(400).json({ error: true, message: "You can set alerts for BTC and ETH only.", }); // Create alert by pushing the object to the alerts array. alerts.push({ asset: asset, price: price, email: email, type: type.toLowerCase(), createdAt: new Date(), }); return res.send({ success: true, message: "Alert created" }); //Send response } catch (error) { return res.status(500).json(errorObject); }};I’m storing the alerts in-memory to keep this demo simple. The alerts will be lost if we stop the server as they are stored temporarily on the volatile memory. Please use a database if you want to use this in production.
Next, define the logic to retrieve all the active alerts. This endpoint is simple. We need to just return the alerts array.
exports.GetAlerts = async (req, res) => { return res.send({ success: true, alerts: alerts } )};That’s it. We need to define endpoints to create and retrieve alerts.
router.get(“/alerts”, Controller.GetAlerts);router.post(“/alert”, Controller.CreateAlert);After defining all three routes, the router.js file will look like this :
const express = require("express");const router = express.Router();const Controller = require("./controller");router.get("/prices", Controller.CurrentPrice);router.get("/alerts", Controller.GetAlerts);router.post("/alert", Controller.CreateAlert);module.exports = router;We need to import and use this router file in out app.js file.
const express = require("express"); const routes = require("./router"); //Import the routesconst app = express(); // Initialize an express instanceconst PORT = process.env.PORT || 5000; // Define the portapp.use(express.json());// Health check endpoint (optional)app.get("/", (req, res) => { return res.json({ status: "Up and running" });});app.use(routes); //Load the endpoints // Start listenting for requestsapp.listen(PORT, () => console.log("Server started listening!"));Now it’s time to have some fun. Let’s open up the Postman and test our endpoints. First we will try creating an alert for BTC with a threshold price below 49000.095 USD

You can see the Alert created message in the response. Similarly you can try creating multiple alerts for the threshold price and you can also specify the email address too for receiving the alerts.
Now we can try fetching all the alerts.

It works! We have implemented all the endpoints required for this project. Now we need to remove the expired alerts. I have set the expiry time for the alerts to 5 minutes. You can modify it based on your requirements.
Implementing the Cron Jobs (Scheduler):
We need to implement 2 schedulers. One is to remove the expired alerts and the other is to send alerts to email if the price of the specified coin goes above/below the threshold.
First, let us implement the removeExpired service. To keep things simple, the worker will iterate through all the active alerts every 10 seconds and remove the alerts that are created before 5 minutes from now.
const CronJob = require("cron").CronJob;const alerts = require("../alerts");var removeExpired = new CronJob("*/10 * * * * *", // Run every 10 secs async function () { alerts.forEach((alert, index) => { // iterate through all the alerts // Convert to ms and compare if (new Date(alert.createdAt).getTime() + 5 * 1000 < new Date().getTime()) // If the alert created time + 5mins is greater than current time, remove from array alerts.splice(index, 1); }); });removeExpired.start();Save the file and require it on the controller.js file :
require(./workers/removeExpired.js)Scheduler starts as soon as we start the application.
Now, start the server and add some alerts. You can see that the alerts are removed in 5 minutes after they are created. You can use the GET /alerts endpoint to confirm that the removeExpired service works as expected.
Before implementing our second scheduler — sendAlert we need to implement the sendEmailNotification helper function to send email notifications.
Open up the helpers/sendEmailNotification.js and add the following :
const nodemailer = require("nodemailer");const config = require("../config");module.exports = async (email, message, title) => { try { const smtpEndpoint = "smtp.sendgrid.net"; //SMTP server const port = 465; const senderAddress = `${config.NAME} <${config.EMAIL_ADDRESS}>`; var toAddress = email; const smtpUsername = config.SENDGRID_USERNAME; const smtpPassword = config.SENDGRID_PASSWORD; var subject = title; var body_html = `<html><p>${message}</p></html>`; // Create the SMTP transport. let transporter = nodemailer.createTransport({ host: smtpEndpoint, port: port, secure: true, // true for 465, false for other ports auth: { user: smtpUsername, pass: smtpPassword, }, }); // Specify the fields in the email. let mailOptions = { from: senderAddress, to: toAddress, subject: subject, html: body_html, }; await transporter.sendMail(mailOptions); //Send the mail. return { error: false }; } catch (error) { console.error("send-email-error", error); return { error: true, message: "Couldn't send email", }; }};Save the file. Make sure you add the USERNAME, PASSWORD, EMAIL, and NAME in the config file.
module.exports = { errorObject: { error: true, message: "Oops, something went wrong.Please try again later.", }, //****These values must be configured as env variables in production**** SENDGRID_USERNAME: "", SENDGRID_PASSWORD: "", NAME: "", EMAIL_ADDRESS: "", REDIS_URL: "redis://127.0.0.1:6379",};Add the following contents to workers/sendAlert.js:
const CronJob = require("cron").CronJob;var Queue = require("bull");const alerts = require("../alerts");const config = require("../config");const currentPrice = require("../helpers/currentPrice");const sendEmailNotification = require("../helpers/sendEmailNotification");var alertQueue = new Queue("alerts", config.REDIS_URL); //Create a queuealertQueue.process(async function (job, done) { //Consumer process const { recipient, title, message } = job.data; let sendEmailResponse = await sendEmailNotification( recipient, message, title ); if (sendEmailResponse.error) { done(new Error("Error sending alert")); } done();});var sendAlert = new CronJob("*/25 * * * * *", // Execute every 25 secondsasync function () { const currentPrices = await currentPrice(); if (currentPrices.error) return; let priceObj = { BTC: currentPrices.data.BTC, ETH: currentPrices.data.ETH, }; alerts.forEach((alert,index) => { let message, title, recipient; if ( alert.type == "above" && parseFloat(alert.price) <= parseFloat(priceObj[alert.asset]) ) { message = `Price of ${alert.asset} has just exceeded your alert price of ${alert.price} USD. Current price is ${priceObj[alert.asset]} USD.`; title = `${alert.asset} is up!`; recipient = alert.email; alertQueue.add( //Add to queue (Producer) { message, recipient, title }, { attempts: 3, // Retry 3 times for every 3 seconds backoff: 3000, } ); alerts.splice(index,1) // remove the alert once pushed to the queue. } else if ( alert.type == "below" && parseFloat(alert.price) > parseFloat(priceObj[alert.asset]) ) { message = `Price of ${alert.asset} fell below your alert price of ${alert.price}. Current price is ${priceObj[alert.asset]} USD.`; recipient = alert.email; title = `${alert.asset} is down!`; alertQueue.add( //Add to queue (Producer) { message, recipient, title }, { attempts: 3, backoff: 3000, } ); alerts.splice(index,1) // remove the alert once pushed to the queue. } });});sendAlert.start();I’m running the scheduler every 25 seconds. You can change it as per your requirement. Once an alert is pushed to the queue, we will remove it from the alerts array to prevent redundant alerts.
Also, make sure that the redis-server is up and running on port 6379 if you are using localhost and the REDIS_URL must be entered correctly in the config.js file.
I have set the max retry times as 3 and the backoff period as 3 seconds, which means in case that some error occurred while sending the email, the bullmq’s consumer process will try to process the request at a time interval of 3 seconds. If the request fails 3 times, then it will be discarded.
Now save the file and start the server by running the npm run start command.
Open up the postman and add some alerts. You’ll get alerts to the specified email address like this.

If the email didn’t hit the inbox, make sure you check the spam and promotions folder. Also, you need to whitelist the sender in your SendGrid account, so that your emails will hit the inbox.
You can find the entire source code for this project here on GitHub.
Conclusion:
As I previously mentioned, this application is not suitable for production unless you make some more improvements like saving the alerts to a database, passing the keys as env variables, configuring process managers, and so on.,
Try to take this demo to the next level by adding some more features.
You can try :
- Adding push notifications or SMS alerts
- Adding more coins/tokens.
- Sending an alert to multiple email addresses.
- Turning this demo into a full-stack application by designing the UI
- Taking it online by deploying on the cloud server.
That’s all folks. As always, feel free to share your thoughts and suggestions.
Happy coding!
- Learn to build a microservice for IP lookup using NodeJS
- Generate Your Own Bitcoin Wallet within 5 Minutes