How to Create Your Own Secure Node.js REST API Boilerplate
NodeJS
Express
MongoDB
01/23/2021
A plug-and-play starter template that can help you to kick start your web application API development.
In this article, we will be building a basic starter template (or boilerplate)which can be used for building robust and secure REST APIs using Node, Express, and Mongoose. It can be used for any kind of projects regardless of logic and requirements.
You may ask that there are many starter templates and why I am reinventing the wheel. All the templates out there are great, but I felt that I must develop one in my style so that some developers out there with a similar development style may like it and get benefited out of it.
Having said that, let’s get started.
Prerequisites :
Install NodeJS and NPM from https://nodejs.org/en/download/.
Setup MongoDB Community Server or Use MongoDB Atlas: https://www.mongodb.com/try
Also, I’ll be using a tool called “Postman” to test the API. You can download it from https://www.postman.com or feel free to use any other tools of your choice.
A code editor. Of course, I prefer VS Code.
Getting started 🚀️ :
Create a new directory called “node-boilerplate” and navigate to the directory.
mkdir node-boilerplate && cd node-boilerplateInitialize a new project using the command npm init.
You will be asked a series of questions about the project.

After answering those questions, verify the details and press “Enter”. You can find a new file called “package.json” created in your project root directory.
This is just like a configuration file for your application.
Now, we are going to install all the dependencies which I will use commonly while building a REST API using Node, Express, and MongoDB.
npm i express mongoose dotenv uuid mongo-sanitize morgan --saveUse sudo if needed.
Now let us go through every module to understand its purpose.
Express: Express is a fast, essential, and the most famous web framework of Node.js, designed for building web applications and APIs. It has been called the de facto standard server framework for Node.js.
Mongoose: Mongoose is an Object Data Modeling (ODM) library for MongoDB and Node.js. It manages relationships between data, provides schema validation, and is used to translate between objects in code and the representation of those objects in MongoDB.
Dotenv: In the production systems, we should not hardcode the sensitive data like API Keys, Secret Tokens, etc directly within the codebase (based on the Twelve factor App method). We will pass them as environment variables. This module helps us to load environment variables from a .env file into process.env
UUID: We need to generate a unique id for some stuff, regardless of the application. Whatever may be the core logic, we will need to generate unique ids in our application like “userId”, “ordered”, “articleId” and so on. So this is a popular package to create random unique ids in our application
Mongo-Sanitize: This module is used to secure our application from query selector injection attacks. The sanitize function will strip out any keys that start with ‘$’ in the input, so we can pass it to MongoDB without worrying about malicious users overwriting query selectors.
Morgan: It is an HTTP request logger middleware. We will use this package to log the requests that hit our server. This module supports various options.
After installing all the modules, you must see the following line at the end of your terminal.
found 0 vulnerabilitiesIf there are any vulnerabilities, immediately upgrade the vulnerable module to the latest version or use the npm audit fix command to mitigate the issue.
Still, the vulnerability persists? Then it’s better to find an alternate module instead of using the vulnerable one.
The Starter :
Once all the dependencies are installed, create a file app.js in the top-level directory of the project.
Add the following contents to it :
const express = require("express");const morgan = require("morgan");const app = express(); //Create new instanceconst PORT = process.env.PORT || 5000; //Declare the port numberapp.use(express.json()); //allows us to access request body as req.bodyapp.use(morgan("dev")); //enable incoming request logging in dev mode //Define the endpointapp.get("/ping", (req, res) => { return res.send({ status: "Healthy", });});app.listen(PORT, () => { console.log("Server started listening on port : ", PORT);});Now save the file and run node app.js command in your terminal. If everything is ok, then you must see :
Server started listening on port: 5000From this stage, we will be adding more new stuff to our project. So it would be frustrating to restart the development server whenever we make changes.
So we can make use of a library called nodemon, which reduces a lot of development time by automatically restarting our application whenever any file related to our project is altered and saved.
Let’s go ahead and install it.
npm i nodemon --save-devYou can notice that we use the --save-dev flag, which means that we save the module as a development dependency.
Now let us make some changes to our package.json file.
Replace the script section with following code:
“scripts”: { “start”: “node app.js”, “dev”: “nodemon app.js” },Save your package.json and run the following command.
npm run devYou will see the following output in your terminal.

You can notice that it says “watching extensions: js,mjs, json”. In case if you have other types of files, then the changes in those files will not be monitored by nodemon by default. You can configure more extensions, using the nodemon configuration file. You can read more about it in the documentation.
Now try to make some changes in the app.js file, the nodemon will automatically restart the server for us.
That’s cool, isn’t it?
Connecting to the Database :
Now we can connect our application to the database using mongoose.
There are two options. We can either use MongoDB Atlas or use a local MongoDB community server.
I prefer MongoDB cloud for production. So sign up to MongoDB Atlas, create a cluster and obtain the connection string.
Create a .env file in the project root directory. Its where we will store all the environment variables. All the environment variables will be loaded into our application using the “dotenv” module as discussed above.
Add your mongodb connection string to the .env file and save it:
MONGO_URL = <YOUR_CONNECTION_STRING>Now add the following contents to the app.js file.
const express = require("express");const mongoose = require("mongoose"); // Require mongoose libraryrequire("dotenv").config(); // Require the dotenvconst app = express();mongoose .connect(process.env.MONGO_URL) .then(() => { console.log("Database connection Success!"); }) .catch((err) => { console.error("Mongo Connection Error", err); });const PORT = process.env.PORT || 5000;app.use(express.json());app.post("/ping", (req, res) => { return res.send({ status: "Server is up and running", });});app.listen(PORT, () => { console.log("Server started listening on port : ", PORT);});Save the file.
Your output may contain some deprecation warning from ‘mongoose’ .
(node:29440) DeprecationWarning: current URL string parser is deprecated, and will be removed in a future version. To use the new parser, pass option`{ useNewUrlParser: true }` to MongoClient.connect(node:29440) DeprecationWarning: current Server Discovery and Monitoring engine isdeprecated, and will be removed in a future version. To use the new Server Discover and Monitoring engine, pass option `{ useUnifiedTopology: true }` to the MongoClient constructor.Include those options while connecting to the database.
mongoose .connect(process.env.MONGO_URL, { useNewUrlParser: true, useUnifiedTopology: true, }).then(() => { console.log(“Database connection Success!”); }).catch((err) => { console.error(“MongoDB Connection Error”, err); });Now if you save the app.js file, you shouldn’t see those warnings.
Lets Ping!
It’s time to test our server using Postman. Let us try to send a “ping” request to our server by hitting the GET /ping endpoint.

BOOM 🎉 It works. If you ping multiple times and look at your terminal you can see the use of ‘morgan’ library.
You’ll see something like this :

Morgan Log breakdown :
GET: The HTTP request method (like GET, POST, PUT …)/ping: The resource path which we try to access.200: Its the response status code.3.696 ms: The response time in ms37: Response content length in bytes.
Adding security middlewares :
Create a folder middlewares in the project root directory. Inside the folder create a file called cleanbody.js containing the following code :
As discussed above, it’s recommended to sanitize the request before using them in the mongoose queries.
Also, our application APIs must be accessed only from specific domains, so that we can avoid many security vulnerabilities.
To achieve that, we need to create another middleware and plugin for the express middlewares. So that all the requests will be checked against the whitelisted domains.
Create a file called restrictOrigin.js inside the middlewares folder.
const allowedOrigins = ["localhost"]; //list of allowed domainsmodule.exports = (req, res, next) => { let isDomainAllowed = allowedOrigins.indexOf(req.hostname) !== -1; if (!isDomainAllowed) return res.status(403).json({ message: "Access Restricted" }); next();};Save the file, import it in the app.js file and use it.
Add the following line in the app.js file:
app.use(express.json())+ app.use(restrictOrigin); ....Save the app.js file.
In this project the allowed domain is localhost. Change it while using it in your project.
Cool💫 Our boilerplate is almost ready.
Let’s have a look at our project structure.
The Directory Structure :
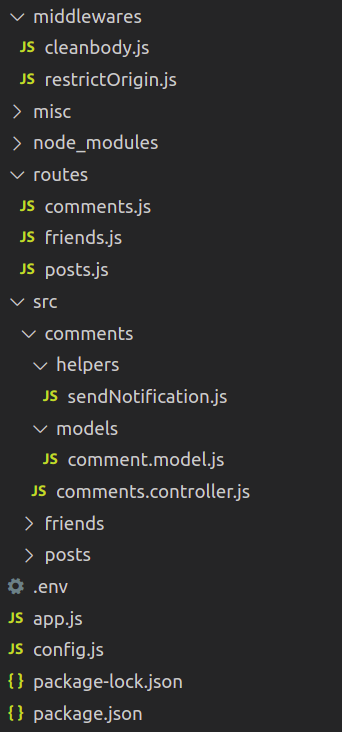
This is the structure of our boilerplate.
Here the folders comments, posts and friends are just added for example. It will vary according to the project requirements.
The Core logic of your application must be implemented inside the src folder. Create directories inside the src folder based on the features. You can create many subdirectories like helpers, models, etc., inside each of the feature folders.
All the endpoints will be defined inside the routes directory. The logic will be handled by the controller files. You can define the basic config options in the config.js file.
Other miscellaneous functions can be defined in the misc folder.
You can use this template to build a secure user authentication service like this.
GitHub repository link.
Conclusion :
Yes, as mentioned above this is a very basic starter template yet it’ll be very helpful once we get used to it. Trust me, by creating our own boilerplate we can save a lot of time and energy when we start working on every new project. Let me know if you have anything to discuss with me. I’ll be happy to hear !
Until next time… 👋👋
- Integrate JWT to your Authentication system within 10 minutes
- Make sure your web application is production ready!