Build Simple and Secure REST API for User Authentication Using Node.js, JWT and MongoDB
Welcome! In this article, we will be developing a secure and lightweight REST API using Node.js, Express server, and MongoDB from scratch that can be used as a backend for authentication systems. This is completely a beginner-friendly article.
As a bonus, I have explained how to create a simple referral system, using which you can share the referral code, and your friends can signup using that code. The concepts we will see throughout this article are completely generic, and it can be implemented using any programming language.
Agenda ✍️
- User signup/registration with Email verification.
- User Login.
- Forgot password and reset password.
- Session management using JWT (JSON Web Tokens).
- JWT gotchas
- Bonus: Simple Referral System!
In this part only the first 3 points will be covered. The remaining features are implemented in Part II.
Preparation 🏃
-
Install NodeJS and NPM from https://nodejs.org/en/download/.
-
Setup MongoDB Community Server or Use MongoDB Atlas: https://www.mongodb.com/try
-
Also, I’ll be using a tool called “Postman” to test the API. You can download it from https://www.postman.com or feel free to use any other tools of your choice.
Project Setup 📑
Initialize a fresh Node.js project by running the npm init command in the application root folder and answer the questions. If you want to set default values to all the questions, you can append the --y flag, like npm init --y. Here, we are trying to create a node application with a basic configuration.
If you check your project folder, you’ll see a tiny file called the package.json created by the npm init command.
Note: We will not install all the dependencies at once. We will install them only at that particular step.
Let us spin up the express server. For doing that, install the express module using the command
npm i express --save command.After installation, create a file app.js in the application root directory.
const express = require("express");
const PORT = 5000;
const app = express();

app.get("/ping", (req, res) => {
  return res.send({
    error: false,
    message: "Server is healthy",
  });
});

app.listen(PORT, () => {
  console.log("Server started listening on PORT : " + PORT);
});
Now save the file and run node app.js command in your terminal or command prompt. You must see the following output.
Server started listening on PORT : 5000Now let’s test it by hitting the /ping endpoint from the Postman.

Yay! Isn’t it cool? We have created a local web server that can handle HTTP requests using Express.
Let us connect to MongoDB from our application. To do so, we need to install a couple of dependencies by running :
npm i mongoose dotenv body-parser --save-
Mongoose : An Object Data Modeling (ODM) library for MongoDB and Node.js.
-
Dotenv : Used to load environment variables.
-
Body-parser : Helps to parse the incoming request bodies so that we can access using the req.body convention. If you are new to this don’t worry, you’ll catch up in a moment.
You can either use MongoDB Atlas or Local mongo server. There are many articles to help you get the connection string from Atlas.
For Manual installation : https://docs.mongodb.com/manual/installation/
Once you are ready with it, create a file called .env in the project root folder.
Add this line to the .env file:
MONGO_URI = <MONGO_CONNECTION_STRING>If you are using MongoDB Atlas, your connection string starts like mongodb+srv://…
I’m using local server for this server.
mongodb://127.0.0.1:27017/TheNodeAuth is my connection string.
We can connect our application to the mongodb server by importing the mongoose package.
const express = require("express");
const mongoose = require("mongoose");
const bodyParser = require("body-parser");
require("dotenv").config();

const PORT = 5000;

mongoose.connect(process.env.MONGO_URI, {
    useNewUrlParser: true,
    useUnifiedTopology: true,
  })
  .then(() => {
    console.log("Database connection Success.");
  })
  .catch((err) => {
    console.error("Mongo Connection Error", err);
  });

const app = express();

app.use(bodyParser.json());
app.use(bodyParser.urlencoded({ extended: true })); //optional

app.get("/ping", (req, res) => {
  return res.send({
    error: false,
    message: "Server is healthy",
  });
});

app.listen(PORT, () => {
  console.log("Server started listening on PORT : " + PORT);
});
Once the changes are done, lets run our project : node app.js
If everything is fine, the your output will be something similar to this 👇:
Server started listening on PORT : 5000
Database connection Success.
That’s great. We have successfully completed our project setup. Now let us start building the REST APIs for user authentication.
Creating the User Schema
Create a folder called src inside the project root directory. This is the folder inside which we will create all the required files, that will handle user schema modeling, business logic, helper functions, etc.
Inside the src folder, create another folder called users.
Okay, inside the users folder, create a file called user.model.js. I personally prefer this kind of naming convention. You can also use the method you prefer.
const mongoose = require("mongoose");
const Schema = mongoose.Schema;

const userSchema = new Schema(
  {
    userId: { type: String, unique: true, required: true },
    email: { type: String, required: true, unique: true },
    active: { type: Boolean, default: false },
    password: { type: String, required: true },
    resetPasswordToken: { type: String, default: null },
    resetPasswordExpires: { type: Date, default: null },
  },
  {
    timestamps: {
      createdAt: "createdAt",
      updatedAt: "updatedAt",
    },
  }
);

const User = mongoose.model("user", userSchema);
module.exports = User;
We have created the user schema and exported it. Now we need to import it and start defining the logic for authentication.
Now create a file called user.controller.js inside the src/users folder. Inside this file, we will implement all the logic for all the features like user signup, login, reset password, etc.
User Signup
For signup, we need to validate the request body first. Then we need to generate a unique id for each user. One can argue that the mongoose itself will generate a unique id for each document. AFAIK, it is safe to use and expose the ObjectId only up to some extent. Hence we will use a well-known unique id generator, “UUID.”
Also we need to validate the incoming request, ie., we need to check whether the email has been entered, whether it is a valid email id, all the required fields are present, the minimum length of the password, etc. Though these things can be done at the client-side, it is not bad to add an extra layer of security to our application by adding a server-side validation.
For this purpose, we will use the joi package.
So, lets install the packages needed:
npm i joi uuid --saveFlow
- Validate the user entered fields (email, password, confirm password) using joi.
- Check whether already an account with the given email exists in our database.
- If it exists, then throw an error.
- If not, then hash the password using the
bcryptjsnpm module. - Generate a unique user id using the uuid module.
- Generate a random 6 digit token (with an expiry time of 15 minutes) and send a verification email to the user’s email id.
- Then save the user in the database and send a “success” response to the client.
To send email to the users, we will use the nodemailer module along with the Sendgrid SMTP credentials. Signup at SendGrid (yes, it’s free) and place your SendGrid API key in the .env file.
SG_APIKEY** = < YOUR_SENDGRID_KEY >Install the nodemailer npm package:
npm i nodemailer --saveWe need some helper functions and additional modules to hash the password, send verification code to email, and so on.
Inside the src/users directory, create a new folder called helpers create a file mailer.js inside the helpers folder.
require("dotenv").config();
const nodemailer = require("nodemailer");

async function sendEmail(email, code) {
  try {
    const smtpEndpoint = "smtp.sendgrid.net";

    const port = 465;

    const senderAddress = “YOU <you@yourdomain.com>";

    var toAddress = email;

    const smtpUsername = "apikey";

    const smtpPassword = process.env.SG_APIKEY;

    var subject = "Verify your email";

    // The body of the email for recipients
    var body_html = `<!DOCTYPE>
    <html>
      <body>
        <p>Your authentication code is : </p> <b>${code}</b>
      </body>
    </html>`;

    // Create the SMTP transport.
    let transporter = nodemailer.createTransport({
      host: smtpEndpoint,
      port: port,
      secure: true, // true for 465, false for other ports
      auth: {
        user: smtpUsername,
        pass: smtpPassword,
      },
    });

    // Specify the fields in the email.
    let mailOptions = {
      from: senderAddress,
      to: toAddress,
      subject: subject,
      html: body_html,
    };

    let info = await transporter.sendMail(mailOptions);
    return { error: false };
  } catch (error) {
    console.error("send-email-error", error);
    return {
      error: true,
      message: "Cannot send email",
    };
  }
}

module.exports = { sendEmail };
That’s it, save the file.
Now let us create a function to hash the password. We will use brycptjs to hash the password. To install the module, run:
npm i bcryptjs --saveIn the user.model.js file, import the module as
const bcrypt = require(‘bryptjs’);At the bottom of the file, define the function to hash the password.
module.exports.hashPassword = async (password) => {
    try {
        const salt = await bcrypt.genSalt(10); // 10 rounds
        return await bcrypt.hash(password, salt);
    } catch (error) {
        throw new Error("Hashing failed", error);
    }
};
Below the resetPasswordExpires field, add these two fields and save the file.
emailToken: { type: String, default: null },
emailTokenExpires: { type: Date, default: null },
Lets implement the SignUp feature on controller.js
const Joi = require("joi");
require("dotenv").config();
const { v4: uuid } = require("uuid");

const { sendEmail } = require("./helpers/mailer");
const User = require("./user.model");

//Validate user schema
const userSchema = Joi.object().keys({
  email: Joi.string().email({ minDomainSegments: 2 }),
  password: Joi.string().required().min(4),
  confirmPassword: Joi.string().valid(Joi.ref("password")).required(),
});

exports.Signup = async (req, res) => {
  try {
    const result = userSchema.validate(req.body);
    if (result.error) {
      console.log(result.error.message);
      return res.json({
        error: true,
        status: 400,
        message: result.error.message,
      });
    }

    //Check if the email has been already registered.
    var user = await User.findOne({
      email: result.value.email,
    });

    if (user) {
      return res.json({
        error: true,
        message: "Email is already in use",
      });
    }

    const hash = await User.hashPassword(result.value.password);

    const id = uuid(); //Generate unique id for the user.
    result.value.userId = id;

   //remove the confirmPassword field from the result as we dont need to save this in the db.
   delete result.value.confirmPassword;
   result.value.password = hash;

    let code = Math.floor(100000 + Math.random() * 900000);  //Generate random 6 digit code.
    let expiry = Date.now() + 60 * 1000 * 15;  //Set expiry 15 mins ahead from now

    const sendCode = await sendEmail(result.value.email, code);

    if (sendCode.error) {
      return res.status(500).json({
        error: true,
        message: "Couldn't send verification email.",
      });
    }
    result.value.emailToken = code;
    result.value.emailTokenExpires = new Date(expiry);
    const newUser = new User(result.value);
    await newUser.save();

    return res.status(200).json({
      success: true,
      message: "Registration Success",
    });
  } catch (error) {
    console.error("signup-error", error);
    return res.status(500).json({
      error: true,
      message: "Cannot Register",
    });
  }
};
Let us define the endpoint for signup. Create a folder routes in the project root directory and inside the folder create a file called users.js.
const express = require("express");
const router = express.Router();
const cleanBody = require("../middlewares/cleanbody");
const AuthController = require("../src/users/user.controller");

//Define endpoints
router.post("/signup", cleanBody, AuthController.Signup);

module.exports = router;
You should have noticed that I have used something called cleanbody.
We will use the npm package called mongo-sanitize to sanitize the request body.
npm i mongo-sanitize --saveCreate a folder called middlewares in the project root directory and create a file cleanbody.js.
const sanitize = require("mongo-sanitize");

module.exports = (req, res, next) => {
  try {
    req.body = sanitize(req.body);
    next();
  } catch (error) {
    console.log("clean-body-error", error);
    return res.status(500).json({
      error: true,
      message: "Could not sanitize body",
    });
  }
};
Save the file. Now require the routes/users.js file in the app.js file.To do so right above the app.listen(…) line add the following line:
app.use(“/users”, require(“./routes/users”));Save the file and fire the server node app.js. Once the server has been started, and the database connection is established, switch to the postman.
Lets test the signup flow:
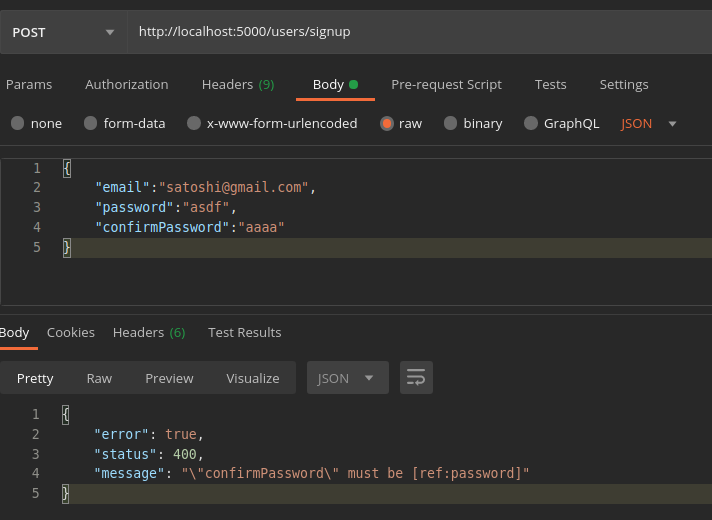
It works! The above error is thrown from the joi validator, which we have defined in our controller file. Now let’s try again with a valid request.
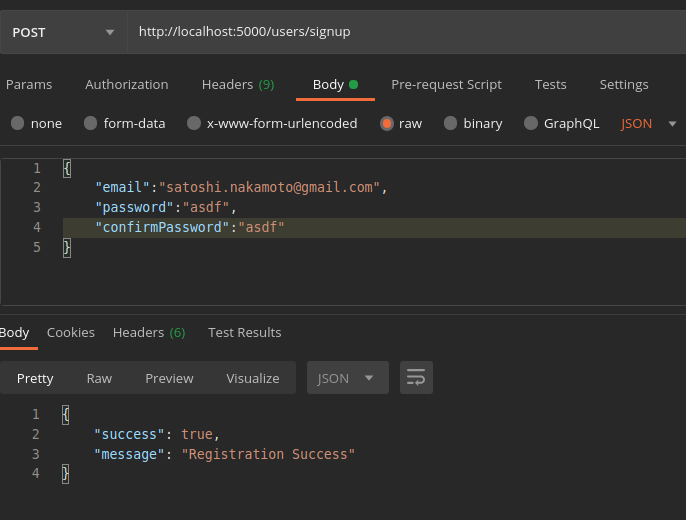
Ok success! Lets verify, by checking the database and the email inbox.

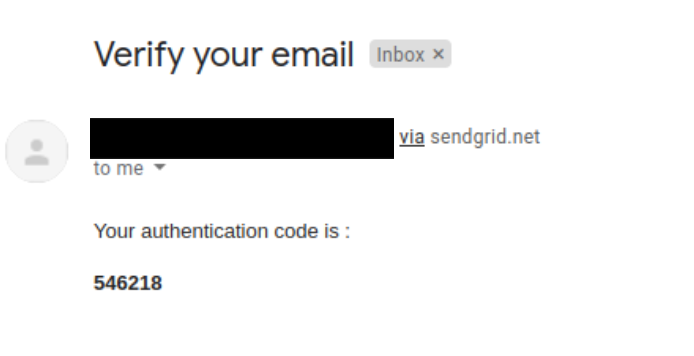
Congratulations ! We have completed the User registration. 💥💥
User Login
After successful signup, we must allow the user to login.Lets create the login function in the user.controller.js
Below the signup function in user.controller.js file, add the following code.
exports.Login = async (req, res) => {
  try {
    const { email, password } = req.body;

    if (!email || !password) {
      return res.status(400).json({
        error: true,
        message: "Cannot authorize user.",
      });
    }

    //1. Find if any account with that email exists in DB
    const user = await User.findOne({ email: email });

    // NOT FOUND - Throw error
    if (!user) {
      return res.status(404).json({
        error: true,
        message: "Account not found",
      });
    }

    //2. Throw error if account is not activated
    if (!user.active) {
      return res.status(400).json({
        error: true,
        message: "You must verify your email to activate your account",
      });
    }

    //3. Verify the password is valid
    const isValid = await User.comparePasswords(password, user.password);

    if (!isValid) {
      return res.status(400).json({
        error: true,
        message: "Invalid credentials",
      });
    }
    await user.save();

    //Success
    return res.send({
      success: true,
      message: "User logged in successfully",
     });
  } catch (err) {
    console.error("Login error", err);
    return res.status(500).json({
      error: true,
      message: "Couldn't login. Please try again later.",
    });
  }
};
Define the login endpoint in the routes/users.js file by adding these lines after the signup endpoint.
router.post(“/login”, cleanBody, AuthController.Login)Save the files and restart the server.
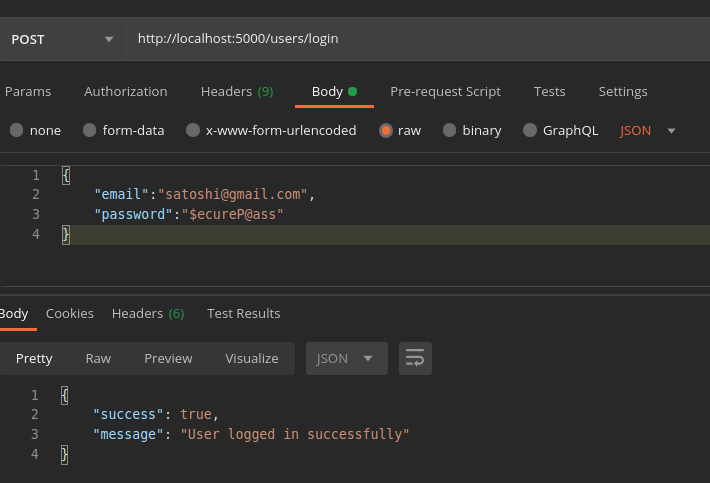
Lets try to test login, using the Postman.
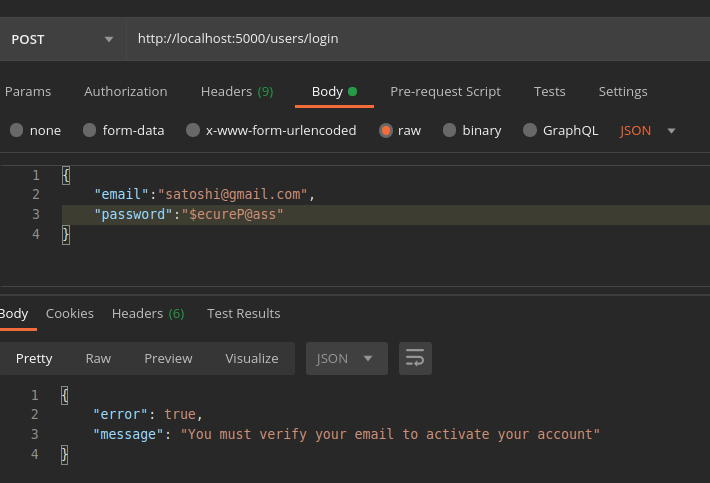
Oops! We get an error message from which we can infer that we cannot log in without activating the account via email verification. Let’s start building the logic for account activation. We will just get the email and the code (OTP sent to email during registration) from the user and verify whether it is valid.
Right below the login controller, add the following code :
exports.Activate = async (req, res) => {
  try {
    const { email, code } = req.body;
    if (!email || !code) {
      return res.json({
        error: true,
        status: 400,
        message: "Please make a valid request",
      });
    }
    const user = await User.findOne({
      email: email,
      emailToken: code,
      emailTokenExpires: { $gt: Date.now() }, // check if the code is expired
    });

    if (!user) {
      return res.status(400).json({
        error: true,
        message: "Invalid details",
      });
    } else {
      if (user.active)
        return res.send({
          error: true,
          message: "Account already activated",
          status: 400,
        });

      user.emailToken = "";
      user.emailTokenExpires = null;
      user.active = true;

      await user.save();

      return res.status(200).json({
        success: true,
        message: "Account activated.",
      });
    }
  } catch (error) {
    console.error("activation-error", error);
    return res.status(500).json({
      error: true,
      message: error.message,
    });
  }
};
Don’t forget to define the endpoint for account activation in the routes/users.js file.
router.patch(“/activate”, cleanBody, AuthController.Activate)Save the file and restart the file. Lets try to activate our account.
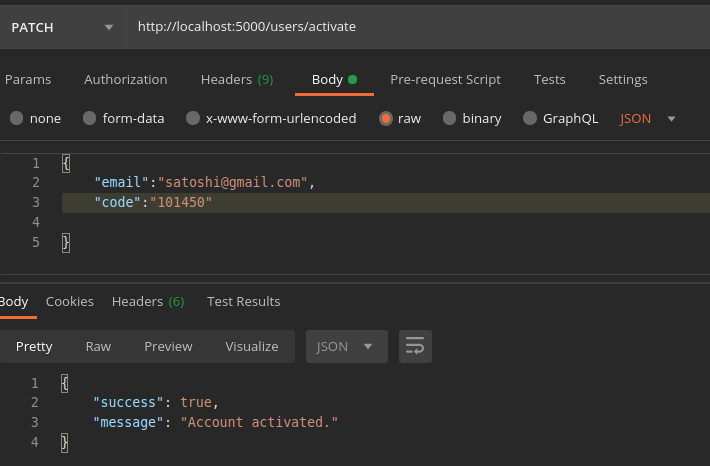
Cool! Let’s move on to implement the forgot password and reset password feature as they are pretty straight forward.
Forgot Password: Get the email from the user, check if the email is present in our DB. If present, we will generate a code valid for 15 mins (resetPasswordToken and resetPasswordTokenExpires) and send it to the email.
Reset Password: Get the code, new password, and confirm password from the user. If the code is valid and passwords match each other, then hash the new password and save it in DB. If not, then throw an error.
In the user.controller.js below activate controller, add these two functions.
Forgot Password
exports.ForgotPassword = async (req, res) => {
 try {
   const { email } = req.body;
   if (!email) {
     return res.send({
       status: 400,
       error: true,
       message: "Cannot be processed",
     });
   }
   const user = await User.findOne({
     email: email,
   });
   if (!user) {
     return res.send({
       success: true,
       message:
         "If that email address is in our database, we will send you an email to reset your password",
     });
   }

   let code = Math.floor(100000 + Math.random() * 900000);
   let response = await sendEmail(user.email, code);

   if (response.error) {
     return res.status(500).json({
       error: true,
       message: "Couldn't send mail. Please try again later.",
     });
   }

   let expiry = Date.now() + 60 * 1000 * 15;
   user.resetPasswordToken = code;
   user.resetPasswordExpires = expiry; // 15 minutes

   await user.save();

   return res.send({
     success: true,
     message:
       "If that email address is in our database, we will send you an email to reset your password",
   });
 } catch (error) {
   console.error("forgot-password-error", error);
   return res.status(500).json({
     error: true,
     message: error.message,
   });
 }
};
Reset Password
exports.ResetPassword = async (req, res) => {
  try {
    const { token, newPassword, confirmPassword } = req.body;
    if (!token || !newPassword || !confirmPassword) {
      return res.status(403).json({
        error: true,
        message:
          "Couldn't process request. Please provide all mandatory fields",
      });
    }
    const user = await User.findOne({
      resetPasswordToken: req.body.token,
      resetPasswordExpires: { $gt: Date.now() },
    });
    if (!user) {
      return res.send({
        error: true,
        message: "Password reset token is invalid or has expired.",
      });
    }
    if (newPassword !== confirmPassword) {
      return res.status(400).json({
        error: true,
        message: "Passwords didn't match",
      });
    }
    const hash = await User.hashPassword(req.body.newPassword);
    user.password = hash;
    user.resetPasswordToken = null;
    user.resetPasswordExpires = "";

    await user.save();

    return res.send({
      success: true,
      message: "Password has been changed",
    });
  } catch (error) {
    console.error("reset-password-error", error);
    return res.status(500).json({
      error: true,
      message: error.message,
    });
  }
};
Define the endpoints for the forgot password and reset password features in route/user.js file
router.patch(“/forgot”,cleanBody, AuthController.ForgotPassword);
router.patch(“/reset”,cleanBody,AuthController.ResetPassword);
Save the files, fire the server and switch to Postman.
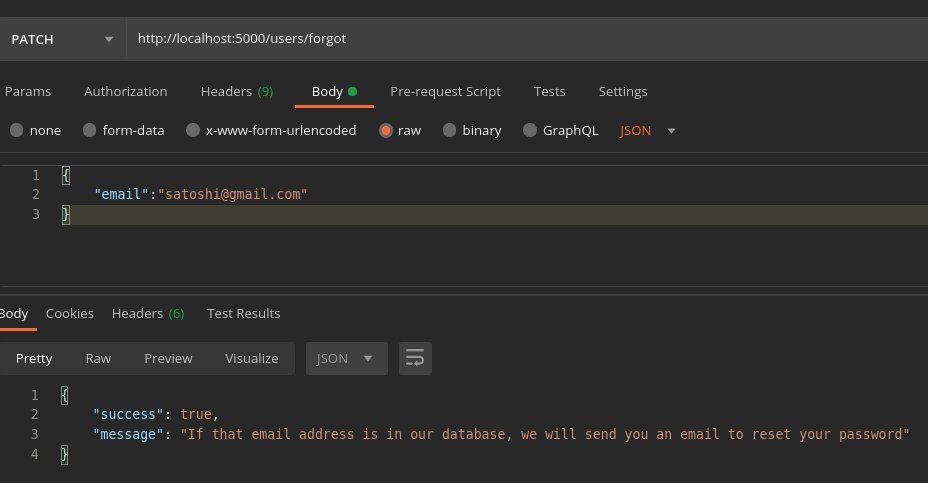
Lets check in our DB .

It works. The code will be delivered to the email. Lets go ahead and change our password
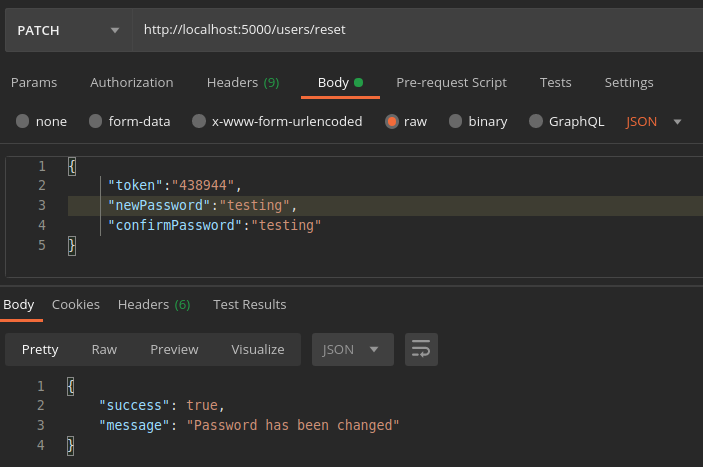
Now lets check whether the changes are reflected in DB.

Yes! You can see that the resetPasswordToken and resetPasswordExpires have changed to “null,” the hash in the password field has also been updated.
Now lets login with our old password
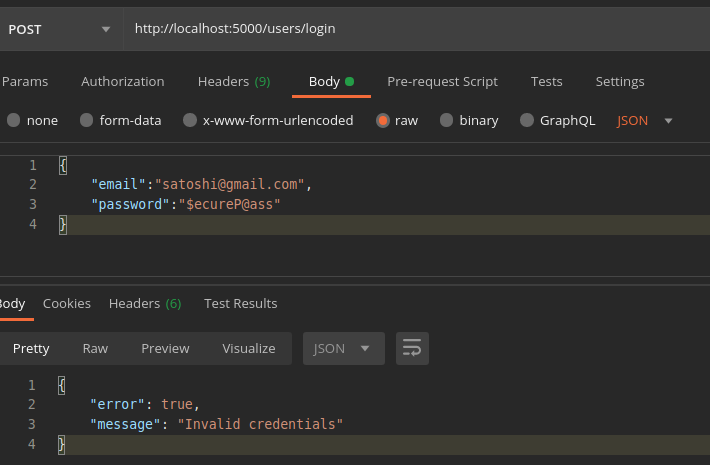
Okay, let us try with our new password.
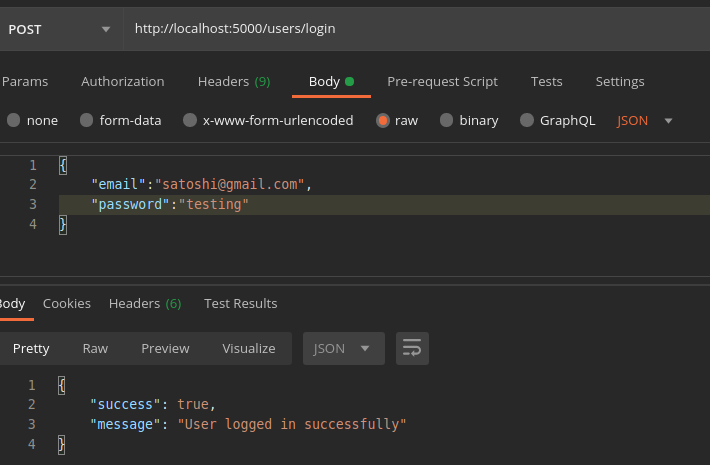
Cool 💪 Everything is working well. Till now, we have implemented User signup, login, account activation, forgot password, and reset password along with some helper functions to sanitize the body, sending emails, and so on.
You can access full source code here.
Conclusion
Next, we need to implement user session management via JSON Web Tokens and a Simple referral system. I think this article is already too big. Hence I decided to break this into two parts. So we will continue implementing the remaining features in Part II. Meanwhile, feel free to share your thoughts, I’ll be happy to discuss.
Thank you for your time!